
Updated on March 12, 2023
How to Make A BBQ Burner
This is an instruct able because I needed a propane burner for a DIY griddle project and thought it would be a good idea to show how to construct one. It was out of the question to buy a burner since the dimensions and wattage I need aren’t available off the shelf. This may also be useful if you need to replace or repair a BBQ burner.
If you decide to mess around with propane, keep in mind that it’s quite hazardous, so do so at your own risk and peril. Make sure you’re wearing a pair of goggles and a pair of gloves at the very least. You don’t want carbon monoxide poisoning if you do this outdoors or in an open garage.
Step 1: Materials and Tools
Depending on the task at hand, additional substances might be substituted with what I used:
- Stainless steel tube, 1 inch x 1/16 inch (could substitute this with regular steel but stainless will last longer)
- Fitting for a 3/4″ to 1 1/2″ black iron reduction
- One-eighth inch brass NPT nipple
- A brass NPT end cap with a diameter of 1/8″
- A gas-rated 1/8″ ball valve
- Bar stock in 3/4″ thickness of steel
- Regulator and hose for low-pressure BBQ (depending on how many burners you hook up you will need to increase the capacity of the regulator)
- Propane pipe to 1/8″ NPT thread flare fitting
- PTFE tape or pipe dope for the propane tank
Tools:
- Drills and Drilling bits
- If you can’t locate them locally, you can buy a set from Amazon.com.
- It has an 8-32 tap as well as a 1/8″ NPT tap
- MIG or cast iron welding rods are both acceptable methods of joining metals together. Stainless steel wire is used to weld (this makes things easier but it is possible to braze the parts together as well with a propane torch)
- Sawhorse: the hand-held power tool
- Punch in the middle
- Cutting disc for angle grinder
Step 2: Theory and Design
So, in layman’s words, let’s speak about theory:
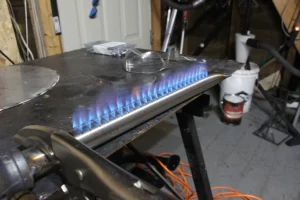
As gas is driven out of a tiny aperture positioned at the end of the burner, it drags air along and mixes it within the burner tube, which is how the venturi effect works in this burner design. Propane and air are mixed together and pushed out of the burner holes or slots into the combustion chamber.
With a little experimentation, I was able to get the burner to light up with a gorgeous blue flame using propane and air. This indicates that there is unburned fuel and not enough air combined with the propane for optimal combustion if you see a yellow or orange flame. If the tube is too tiny and the orifice hole is too big, the mixture and combustion are not properly mixed and are incomplete.
Various orifice holes were tried for this design, including the following:
- 1/32 of the time “insufficiently large blue flames
- 1/64 “”too huge,” “too yellow,” and “too strong,” all at the same time
- It’s too small: 0.8 mm
- In other words, it’s perfect. No yellow flame.
- the perfect thickness, with a hint of yellow yet a really strong flame at 1.2 mm
Fortunately, I hit a 1.2-millimeter orifice.
Step 3: Orifice Assembly
Incorporating the orifice assembly
One-eighth inch brass NPT nipple (length is dependent on the application)
A brass NPT end cap with a diameter of 1/8″
A gas-rated 1/8″ ball valve
a 3/4-inch steel tube
Cutting oil and a 1.2mm drill bit were both used to remove the center of the 1/8″ brass NPT end cap. At high speed, propane will flow out of this aperture into the atmosphere.
Also, if your drill’s chuck is too tiny for your drill’s drill bits, wrap some aluminum tape around the drill bit to make the shaft larger.
Step 4: Building the Burner Tube
Stainless steel tubing was used to make the burner’s body, which is difficult to deal with since it hardens. Because drilling holes in the tube would have taken much too long and required far too much effort, I opted to carve 1cm-wide “holes” in the tube for the burners. I cut this down quickly with my portable bandsaw, but a hack saw will work just as well.
The stainless steel tube’s distal end was heated in a vise before being bent shut. When the burner tube has been crimped and “capped,” a flat space may be created where the burner can be mounted. After crimping, the tube’s end was welded shut (this could be brazed as well).
After that, the tube was welded to a 3/4″ to 1 1/2″ black iron reducer fitting, which serves as both an air inlet for the burner and a mounting point for the orifice it would eventually house. It was necessary to weld two 3/4-inch steel tabs to the reducer’s sidewalls in order to accommodate a bolt for installing the orifice assembly. These tabs were tapped for 3-32 bolts. It is also possible to braze this and tap straight into the end of the reducer fitting if you do not have access to a welding machine. To make things a little bit simpler to deal with, I welded on a few tabs.
The black iron reducer fitting is commonly cast iron, which does not weld very well or easily, therefore keep this in mind while welding. The cast iron doesn’t need to be warmed before welding since I’m just doing tack welding. I’m welding using stainless steel wire on a MIG welder since I’ve read that stainless steel wire may be used to weld cast iron. I haven’t had any problems cracking yet. You might also use a nickle welding rod.
Mark the holes in the orifice assembly with a marker so that the propane shoots straight down the burner tube and mixes with the air. Clamp the orifice assembly in place and mark the holes. To attach the orifice assembly to the reducer fitting, holes were bored in the orifice assembly to match the steel tabs and tapped holes.
Drill a 1/8″ NPT tap hole in the 3/4″ steel stock using a centre punch. Cut the threads into the hole using a lot of cutting oil. For the brass 1/8″ NPT pipe nipple, you may use this hole. In order to seal the entrance of the tube, use the cap that was previously drilled with an orifice hole to cover the nipple.
Using the nipple as a handle, attach the ball valve to the opposite end. You should use PTFE tape or pipe dope on the threads of all of the fittings to create a leak-free seal.
Step 5: Hooking It Up and Testing
How to connect the propane tank to the burner In my instance, the ball valve, I utilized a fitting that connected the propane hose’s flare fitting to the regulator’s 1/8″ NPT threads. Use what I have done as a suggestion and check with your local propane supplier or fitting shop to acquire the right fittings for you.
Propane Regulator Size: 80,000 BTUs; I utilised a low-pressure regulator for a BBQ, which is big enough to manage the number of burners’ total capacity. Overcapacity is preferable than a shortage. Remember that the regulator’s flow rate is not the same as the pressure it can provide. Flow rate There are two types of propane regulators: low-pressure regulators (less than 1 psi) and high-pressure regulators (more than 1 psi). An adjustable high-pressure regulator may also be utilized, however it depends on the intensity of the flame you want.