
Updated on March 9, 2023
I will not extend this article by explaining what a p-trap is and how it works as we all know how necessary it is to connect a P-trap to a wall drain to prevent sewer gasses from entering your kitchen. I will save up your time by telling you directly the few simple steps of connecting the pipes together. I also assure here that the technique I am gin to mention below won’t take much of your precious time.
The best part is there are no special tools required to perform this method, you can do everything with your hands. Moreover, there are also some tips given below in this article that will help you a lot in the later functioning of the P-trap. So tag along to discover the easiest method on the internet.
How to Connect P Trap to Wall Drain
Teach-in
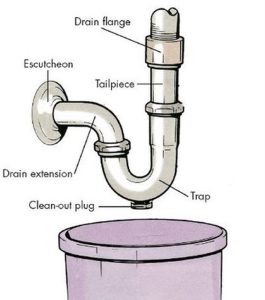
To start with this procedure you first need a P trap kit which is easily available in any hardware shop. The kit I used to connect my P trap to the wall drain included two waste drain pipes, a plastic or rubber washer, and two slip-joint nuts. These two pipes must be joined together first in a way that it forms a small u with an extended right arm. also, this is called a P trap because it looks like a P, but I will mention this as U because I think it will be easier for you to understand.
To join them you first need a u-shaped drain pipe and then take the other pipe and slip it into the first one so that they form u shape with an extended right arm. Close them together by using a slip joint. The best part is you don’t need any kind of tool over here and can do this step using your hands.
Now see which side makes the small u shape. Place this u-shaped pipe hole into the sink drain pipe. But you will notice that these two pipes are not of the same size, so here comes the washer. Now we are going to use washers to connect the sink drain pipe and the P trap together. Now you must be thinking that there are two washers of different sizes, which one to use? Well, you have to select the one which sits best with your sink drain pipe.
Also, keep in mind that the tapered side of the washer should face the P trap pipe. Now slip on u shaped side of the p trap on the sink pipe. But wait as there are complications that you may face and that the horizontal pipe might be longer than your wall pipe. So before installation, you need to check it as well.
If you find that pipe a little longer then don’t worry as you don’t need to go anywhere else for help. Firstly, slip the drain pipe into the wall drain and mark how much pipe is needed to be cut down then cut the pipe with the sharp axe, which is easily available in any household nowadays. But while cutting the axe make sure you wear thick hand gloves as it can be dangerous if mishandled.
Step 1
Now as the drain line pipe is of perfect size, it’s time that you attach the whole P trap pipe. Firstly, attach the drain line pipe to the wall drain pipe by using the slip joint nut facing yourself. Take this nut to the end where you will attach u shaped pipe. Now add another nut joint facing towards the wall and then, lastly, the washer facing the wall. If you already have a wall drain point then you don’t need to put the washer and the joint from the kit and place that nut only
Tighten the nuts to the wall drain line. Now join the u-shaped pipe to the drain line pipe and the point nut you added before must be tightened here. now connect the other end of the u-shaped pipe with the sink drain pipeline and close it with the nut as well. For this, you might need an extra nut. These nuts are easily available at any hardware shop.
Step 2
Now comes the part where you need to tighten up the whole joint nuts. This step is really very important and has to be performed carefully because a minor mistake can make you reopen the whole P trap kit once again. And the leakage from the joints can make your lower sink area develop mold and fungus.
So firstly join the whole nuts gently, do not tighten them up too much until you see that the pipes are positioned perfectly. Once you notice that pipes are in their right places, you can now tighten up the points. But do not tighten them up to much use the hands only but if you wanna make sure that they are not loose, you can use any hardware tools to tight them up perfectly.
After Installation Test
After you have successfully installed the pipes and have tightened up all the points it’s time that you recheck the P trap. To examine it, turn on the tap above the sink and let the water flow through the pipes for about 3 to 5 minutes. If you don’t see any leakage it means that the pipe has been installed correctly and all the joints are perfectly tight. But if you feel drops of water falling from the pipes then it means the points are not tightened correctly.
Tip
- Never too tighten the joints. This is because an extreme tightening can cause the joints to loosen up and the water starts leaking.
- Always buy a P trap from a renowned company as the low-quality P traps won’t last for even 3 months and can destroy the whole lower sink area with fungus and mold.
Signs that P Trap is Weak
- The early sign is P trap pipe start leaking.
- Cracks might get visible on the pipes.
- The last sign is sewer smell start coming out from the basin.
Precautions
Always buy a P trap from the best hardware makers, and after installation check it at least thrice that there is any leakage or not. Also, always let the water flow thoroughly through the sink so that if there is any debris stuck it gets opened. For this hot water flow works best. Lastly, never drain your hairs into the sink as they are the main reason for clogging the pipes.
Cleaning the Clogged Pipes
If you have vinegar, dishwasher, and baking soda at home, then it’s time to bring them together. Firstly put 1 tablespoon of the dishwasher in a basin hole, then add 1 tablespoon of baking soda in the hole, and then pour 2 glasses of white vinegar over them. Now take a wet towel and close the basin hole for 10 minutes at least. After 10 minutes remove the towel and pour 1/2 gallon of hot boiling water into the sink.
FAQs
How long does it take to connect the trap to the wall drain?
It takes about half an hour to install the P trap to the wall drain. But if you have really well plumbing skills then you can install the P trap pipe in just 10 to 15 minutes.
Can you cut PVC pipes at home?
Yes, you can cut PVC pipes at home but for that, you need to have a sharp axe.
How much does it cost to install a P trap?
The cost to install a P trap depends on many factors. The prices in urban and rural areas are different. Moreover, the kit that you buy from a market has different prices depending on the brand. Also, the installation price is separate from this kit. So, the whole procedure might cost you around $250 to $400.
Conclusion
I hope you found this lowdown helpful and now you are ready to do all this plumbing task on your own, without taking any professional help. Furthermore, by spending a few hundred on the kit you can make this task go easier a thousand times, you don’t need to buy every single thing needed for this task, separately. Also, this kit is quite easy to install and can do it within a couple of minutes.