
Updated on March 12, 2023
How to Make A Soda Can Stove
A cookstove is one of the heaviest items a traveller can carry, so they are constantly looking for methods to lighten their load. If you’re looking for a lightweight or advanced stove that doesn’t take up much room in your backpack, go no further than a conventional alcohol-burning stove. The cost of a commercial camping stove may range from $40 to $100, but you can make your own for as little as 50 cents. Compared to a prefabricated alcohol stove, a homemade one weighs in at less than an ounce. What’s even better is that you can assemble this stove in a single afternoon using just common household items and a few empty metal soda cans. Although store-bought stoves have more options, the DIY version is the better value when it comes to saving money and time.
In many wilderness regions and national parks, alcohol-burning stoves are prohibited because they lack many of the integrated safety elements found in contemporary stoves. An alcohol stove, on the other hand, may be a lifesaver in the event of an emergency or if it is permitted. A step-by-step guide on making one is provided below.
Supplies/Tools
- Drill
- 1/16th-inch drill bit
- 3/16-inch drill bit is needed.
- Blade of a razor
- A 2′′ thick piece of wood
- Fiberglass or cotton for insulation?
- Dried-up booze
- Pliers
- The indelible pen
- Scissors
- Screw
- Stainless-steel container
- Two 12-ounce cans of soda
Constructing the Stove
Step 1: Mark and drill holes in can.
The bottom lip of one of your cans should have 16 properly spaced holes. Each mark should be drilled out with a 1/16′′ drill bit.
Step 2: Trace penny on bottom of can and drill a few more holes.
The same can from Step 1 may be used to draw a circle with a coin.
Five holes need to be drilled in this circle: one in the middle and four surrounding it. For the middle hole, use a 3/16-inch drill bit and a 1/16-inch drill bit.
Step 3: Cut base off both cans.
In order to begin, you will need to first connect the utility blade to a piece of 2×4 (or any other piece of scrap wood approximately 2 inches thick). Keep in mind that the blade must be attached to the board’s broad side. Rather of attempting to level the cut line by hand, use this method.
Step 4: Crimp the top part.
By moving it against the utility blade’s edge, cut off the bottoms of each of your cans. Before detaching the can from the base, make several passes. To aid in the separation of the pieces, gently push the can slightly below the incision with your thumb. Use scissors or sandpaper to smooth up any ragged edges.
Your stove top is the foundation you drilled holes in. Your stove’s bottom is the other base.
Step 5: Add fire starter to base, and put stove together.
To ensure that your stove’s top fits securely within its bottom, use pliers to crimp the edges of the stove’s top.
Make sure your stove’s base is filled with cotton, fiber glass insulation, or handmade char cloth before inserting the crimped top. Applying a high-temperature epoxy may also help seal the gap.
Lighting the Stove
Test your stove in a non-combustible area before using it inside.
Step 1: Place the stove in a small metal bowl.
Of course, you won’t always have access to a metal bowl while out in nature. That’s OK. Instead of a huge bottle of alcohol and stick lighter, your real kit list is likely to contain a tiny travel bottle of alcohol (like an empty travel shampoo bottle) and a compact case for your homemade waterproof matches.
This recipe also works well with an inverted metal lid in the absence of a metallic bowl. This helps to keep the fire from becoming out of control by storing surplus fuel.
Step 2: Add fuel to your stove.
Your stove’s center holes should have roughly an ounce of alcohol (enough for about 10 minutes of burning) poured into them along with a little amount of extra fuel. Last but not least, insert a penny in the middle of your stove and fill it over with a little gasoline. Your stove will be ready to go when you add fuel to the basin and place a penny on top of it.
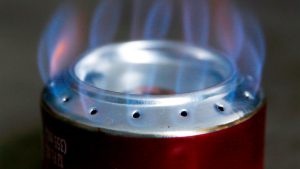
Step 3: Light!
The gasoline in the bowl and on top of the penny should be ignited. Once the stove has preheated for roughly a minute, each of your 16 drilled holes will emit a blue flame.